
미래학자
30 우버 클론 코딩 (nomad coders) 본문
#2.57 HomeScreen Getting Directions part One
구글맵의 기능을 계속 확장하고 있다. 이전에 목적지를 표시했다면, 목적지와 내 위치를 둘다 적절히 표시할 수 있게 하자. google maps에서는 bounds를 생성하는 것인데 아래 그림 그럼 두 위치를 포함하는 bounds를 생성해서 필요한 만큼 줌을 조절하여 화면에 보여준다.
src/routes/Home/HomeContainer.tsx
setBounds라는 함수를 별도로 빼서 목적지를 검색하면 state를 업데이트하고 두 지점간에 bounds를 생성하게 했다.... public toMarker: google.maps.Marker | null = null; public directions: google.maps.DirectionsRenderer | null = null; ... public onAddressSubmit = async () => { const { toAddress } = this.state; const { google } = this.props; const maps = google.maps; const result = await getCode(toAddress); if (result !== false ) { const { lat, lng, formatted_address: formattedAddress } = result; if (this.toMarker) { this.toMarker.setMap(null); } const toMarkerOptions: google.maps.MarkerOptions = { position: { lat, lng } }; this.toMarker = new maps.Marker(toMarkerOptions); this.toMarker!.setMap(this.map); this.setState({ toAddress: formattedAddress, toLat: lat, toLng: lng }, this.setBounds); } } public setBounds = () => { const { lat, lng, toLat, toLng } = this.state; const { google: { maps } } = this.props; const bounds = new maps.LatLngBounds(); bounds.extend({ lat, lng }); bounds.extend({ lat: toLat, lng: toLng }); this.map!.fitBounds(bounds); } }; export default HomeContainer;
http://localhost:3000/ 에서 아무 위치를 검색하면 두 지점을 bounds로 만들어서 지도에 적절하게 줌을 하여 보여준다.
#2.58 HomeScreen Getting Directions part Two
이번에는 길을 지도에 표시하고 얻어온 거리, 시간 정보를 화면에 표시하자.
이어서는 지도에 나의 위치와 목적지의 경로를 표현하는 것을 하자. 이 API는 Directions API로 google API로 별도로 활성화를 해줘야 한다.
https://console.developers.google.com/google/maps-apis/apis/directions-backend.googleapis.com 가서 Directions API를 검색하여 API를 활성화 하자.
src/routes/Home/HomeContainer.tsx setBounds와 마찬가지로 State업데이트가 되면 경로도 업데이트 하도록 하자.
  ...
  public onAddressSubmit = async () => {
  ...
      this.setState({
          toAddress: formattedAddress,
          toLat: lat,
          toLng: lng
        }, () => {
          this.setBounds();
          this.createPath();
        });
      }
    }

    public setBounds = () => {
      ...
    }

    public createPath = () => {
      const { lat, lng, toLat, toLng } = this.state;
      const { google } = this.props;
      if (this.directions) {
        this.directions.setMap(null);
      }
      const renderOptions: google.maps.DirectionsRendererOptions = {
        polylineOptions: {
          strokeColor: "#000"
        },
        suppressMarkers: true
      }

      this.directions = new google.maps.DirectionsRenderer(renderOptions);
      const directionsService: google.maps.DirectionsService = new google.maps.DirectionsService();
      const from = new google.maps.LatLng(lat, lng);
      const to = new google.maps.LatLng(toLat, toLng);
      const directionsOptions:google.maps.DirectionsRequest = {
        destination: to,
        origin: from,
        travelMode: google.maps.TravelMode.DRIVING
      };
      directionsService.route(directionsOptions, (result, status) => {
        console.log(result, status);
      })
    }
  };

  export default HomeContainer;
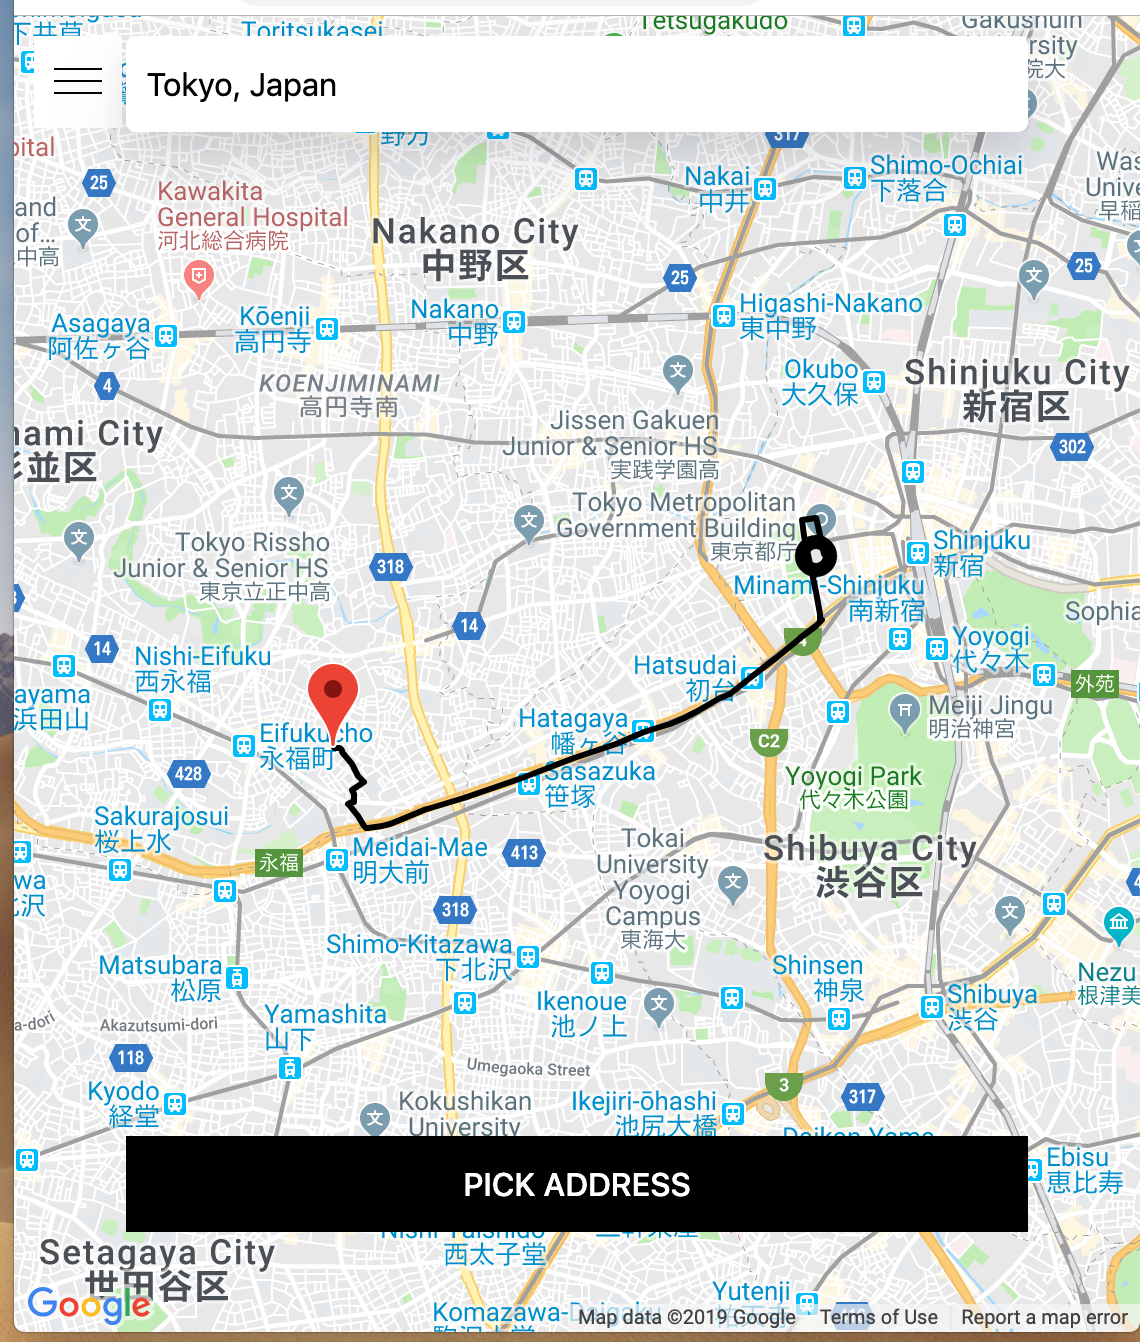
주변을 이제 장소를 검색하고 버튼을 누르면 경로를 콘솔에 찍도록 했다. 잘 찍히는데, 이게 한국에서 장소 API를 못쓰게 해서 그런지 결과가 안나온다... 그냥 일본으로 검색해서 테스트 했다.

위 처럼 결과가 나온다. routes 아 길에 대한 정보인거같고, overview_path, overview_polyline에 지도에 나타낼 시각 자료가 있는거 같다. 또, legs 안쪽에는 거리 정보와 이동 시간 등이 있다. 이 건 나중에 앱에 표시할 예정이다.
일단 검색된 길을 지도에 표시하는 것은 간단하다.
src/routes/Home/HomeContainer.tsx
directionsService.route안쪽에서 directions를 셋팅하고 맵에 지정만 하면 된다. toast 창을 띄우기 위해 toast import!... import { RouteComponentProps } from "react-router"; import { toast } from 'react-toastify'; import { USER_PROFILE } from "sharedQueries.queries"; ... directionsService.route(directionsOptions, (result, status) => { if (status === google.maps.DirectionsStatus.OK) { this.directions!.setDirections(result); this.directions!.setMap(this.map) } else { toast.error("There is no route there."); } }) ...
#2.59 Calculating the Price
이번에는 정보를 이용해서 가격을 계산하도록 하자. 이 강의에서는 니콜라스가 text를 가지고 조작하던데, 사실 거리 데이터는 숫자 자체를 가지고 처리하는게 좋아 보였다. 그래서 나는 숫자로 처리하도록 변경했고, distance, duration, price등의 상태가 추가되었다.
src/routes/Home/HomeContainer.tsx distance, price, duration을 따로 처리하는
handleRouteRequest를 별도로 추가했다.distance와distanceValue가 있음에 주의하자. distance는 문자열 그대로 보여줄 데이터고, distanceValue는 숫자로 조작을 위한 값이다.... interface IState { ... lng: number; distance: string; distanceValue: number; duration: string; price: number; } class ProfileQuery extends Query<userProfile> {} ... public state = { distance: "", distanceValue: 0, duration: "", isMenuOpen: false, lat: 0, lng: 0, price: 0, toAddress: "", toLat: 0, toLng: 0, } ... public render() { const { isMenuOpen, toAddress, price } = this.state; return ( <ProfileQuery query={USER_PROFILE}> {({ loading }) => ( <HomePresenter ... onInputChange={this.onInputChange} onAddressSubmit={this.onAddressSubmit} price={price} /> )} </ProfileQuery> ) } ... public createPath = () => { ... directionsService.route(directionsOptions, this.handleRouteRequest); }; public handleRouteRequest = ( result: google.maps.DirectionsResult, status: google.maps.DirectionsStatus ) => { const { google } = this.props; if (status === google.maps.DirectionsStatus.OK) { const { routes } = result; const { distance: { value: distanceValue, text: distance }, duration: { text: duration } } = routes[0].legs[0]; this.setState({ distance, distanceValue, duration, price: this.carculatePrice(distanceValue) }); this.directions!.setDirections(result); this.directions!.setMap(this.map); } else { toast.error("There is no route there."); } }; public carculatePrice = (distanceValue: number) => { return distanceValue ? Number.parseFloat((distanceValue * 0.003).toFixed(2)) : 0 }; }; export default HomeContainer;src/routes/Home/HomePresenter.tsx Presenter에서는 가격이 표시되는 다른 별도의 버튼을 생성했다. 이 버튼은 책정된 가격으로 Ride를 요청하게 된다. 아직은 기능은 없다.
  ...
  const ExtendedButton = styled(Button)`
    ...
    background-color: rgba(0, 0, 0, .8);
  `;

  const RequestButton = styled(ExtendedButton)`
    bottom: 7rem;
  `;

  ...

  interface IProps {
      ...
    price: number;
  }

  const HomePresenter: React.SFC<IProps> = ({
    ...
    price
  }) => (
    <Container>
      ...
        <AddressBar
         ...
        />
        {!price ? false : (
          <RequestButton
            onClick={onAddressSubmit}
            disabled={toAddress === ""}
            value={`Request Ride ($${price})`}
          />
        )}
        <ExtendedButton
          onClick={onAddressSubmit}
          disabled={toAddress === ""}
          value={price ? "Change address" : "Pick Address"}
        />
        <Map ref={mapRef}/>
      </Sidebar>
    </Container>
  )

  export default HomePresenter;
여기까지 진행하면 가격을 정해서 Ride를 요청하는 버튼이 생성된다. 만약 목적지를 바꾸고 싶다면 변경할 수도 있게 했다.

#2.60 Report Location with HOC
우버 서비스는 수시로 내 위치를 전송하게 된다. Ride를 요청할때도 현재 내 위치가 기준이 된다. 내 위치를 서버에 전달하는 reportMovement 요청을 하도록 작업을 해보자.
src/routes/Home/Home.queries.ts Mutation을 작성한 후 yarn codegen으로 타입을 생성하자.
  import { gql } from 'apollo-boost';

  export const REPORT_LOCATION = gql`
    mutation reportMovement($lat: Float!, $lng: Float!) {
      ReportMovement(lastLat: $lat, lastLng: $lng) {
        ok
      }
    }
  `;
src/routes/Home/HomeContainer.tsx high-oder-component로 작성하면 props에 reportLocation라는 이름으로 props가 들어간다.
handleGeoWatchSuccess에서 reportLocation Mutation을 실행하도록 했다.import { getCode } from "lib/mapHelpers"; import React from "react"; import { graphql, MutationFn, Query } from "react-apollo"; import ReactDOM from 'react-dom'; import { RouteComponentProps } from "react-router"; import { toast } from 'react-toastify'; import { USER_PROFILE } from "sharedQueries.queries"; import { reportMovement, reportMovementVariables, userProfile } from "../../types/api"; import { REPORT_LOCATION } from './Home.queries'; import HomePresenter from "./HomePresenter"; interface IProps extends RouteComponentProps<any> { google: any; reportLocation: MutationFn; } ... public handleGeoWatchSuccess: PositionCallback = (position: Position) => { const { reportLocation } = this.props; const { coords: { latitude: lat, longitude: lng } } = position; this.userMarker!.setPosition({ lat, lng }); this.map!.panTo({ lat, lng }); reportLocation({ variables: { lat, lng } }); } ... export default graphql<any, reportMovement, reportMovementVariables> ( REPORT_LOCATION, { name: "reportLocation" } )(HomeContainer);
우버 서비스를 켠 후 pgAdmin으로 유저의 데이터를 보면 lat, lng가 업데이트가 되어 있다.
'nomad corders' 카테고리의 다른 글
| 33 우버 클론 코딩 (nomad coders) (1) | 2019.06.28 |
|---|---|
| 32 우버 클론 코딩 (nomad coders) (12) | 2019.06.26 |
| 29 우버 클론 코딩 (nomad coders) (0) | 2019.06.21 |
| 28 우버 클론 코딩 (nomad coders) (5) | 2019.06.19 |
| 27 우버 클론 코딩 (nomad coders) (0) | 2019.06.17 |


